Breathe Easy: Wiring Your Bathroom Vent Fan
By B&M Electric September 30, 2025
Bathroom exhaust fan wiring: Essential 2025 Safe
Why Your Bathroom Needs Proper Ventilation
Bathroom exhaust fan wiring is the crucial step that connects your fan to your home’s electrical system, allowing it to remove moisture, odors, and heat. Your bathroom’s exhaust fan does more than just clear a steamy mirror. Without proper ventilation, excess moisture builds on walls, leading to streaky paint, mold, and mildew. As one expert puts it: *”A bathroom without a ventilation fan is like a fireplace without a chimney.”
The benefits of a properly wired bathroom exhaust fan include:
- Preventing mold and mildew growth
- Protecting paint and wallpaper from moisture damage
- Eliminating odors quickly
- Reducing humidity that can spread to other rooms
- Keeping mirrors and windows clear
Planning Your Installation: Sizing, Sourcing, and Safety
A successful installation starts with choosing the right fan and preparing your space. This ensures your new fan performs optimally and integrates safely into your home’s electrical system. For best results, locate the vent fan between the shower and the toilet.
Key Fan Specifications:
- Types: You’ll find standard ceiling-mount fans (motor in the ceiling, more affordable, louder) and remote in-line fans (motor in the attic, quieter, more complex installation).
- Size (CFM): Fan capacity is measured in CFM (cubic feet per minute). A common rule is to multiply the room’s square footage by 1.1. For example, a 100-square-foot bathroom needs a 110 CFM fan. For bathrooms over 100 sq ft, add 50 CFM for each toilet, shower, and tub (100 CFM for a jet tub).
- Sound (Sones): This measures noise level. A modern refrigerator is about one sone. For a quiet bathroom, look for a fan with a sone rating of 2.0 or less.
- Mounting: Ceiling-mounted fans are most common, drawing steam upward. Wall-mounted fans are good for bathrooms on an exterior wall with limited attic access.
Venting Route: Always exhaust the fan to the outdoors—never into an attic or crawlspace. Common routes are through a roof vent, a sidewall vent, or a soffit vent.
For more information about our comprehensive electrical services, explore our offerings. More info about our electrical services
Tools and Materials You’ll Need
Gather your supplies before you start for a smoother process.
Essential tools:
- Voltage tester (crucial for safety)
- Wire strippers, screwdrivers, and pliers
- Drywall saw or jigsaw
- Drill and tape measure
- Safety glasses and gloves
- Stud finder
- Fish tape (for running new cable)
Essential materials:
- New bathroom exhaust fan
- Electrical cable (e.g., 14/2 for a simple fan, 14/3 for a fan/light combo on separate switches)
- Wire nuts or Wago lever nuts
- Ducting (insulated is best) and HVAC foil tape
- Exterior vent cap (roof or sidewall)
- Sealant (silicone or roofing cement)
- Screws and cable clamps
Choosing the Right Fan for Your Space
Consider your bathroom’s layout, budget, and desired features.
Comparison of Standard Ceiling-Mount Fans and Remote In-Line Fans:
| Feature | Standard Ceiling-Mount Fan | Remote In-Line Fan |
|---|---|---|
| Location | Motor in bathroom ceiling | Motor in attic/remote location |
| Installation | Easier, less invasive | More complex, requires ductwork routing |
| Noise Level | Generally louder (motor in living space) | Quieter (motor noise isolated) |
| Cost | More affordable | More expensive |
| Aesthetics | Larger grille in bathroom | Smaller, less obtrusive grille |
| Features | Often combo units (light, heater) | Can serve multiple grilles/bathrooms |
| Ductwork | Shorter runs to exterior | Longer, more complex runs to exterior |
Additional Features to Consider:
- Fans with lights: Integrated LED lights simplify installation by combining two fixtures.
- Fans with heaters: These provide extra warmth but often require a dedicated circuit due to higher power draw.
- Humidity sensor switches: Automatically turn the fan on and off based on humidity levels.
- Timer switches: Set the fan to run for a specific duration to save energy.
Electrical and Venting Prep Work
Proper preparation is key to a safe installation.
Electrical Considerations:
- Power source: You’ll need to tap into an existing circuit or run a new one. Fans with heaters may need a dedicated circuit.
- Existing wiring: Older homes may have outdated wiring (knob-and-tube, ungrounded BX) that requires professional assessment.
- NEC Code for Homeowners: Always adhere to local electrical codes.
Venting Prep Work:
- Duct Run: Plan the shortest, straightest duct run possible to the exterior. Each 90-degree bend reduces airflow.
- Insulated ductwork: Highly recommended in cold spaces like attics to prevent condensation from forming inside the duct.
Step-by-Step Guide to Bathroom Exhaust Fan Wiring
Now for the hands-on part. Electrical safety is paramount. Always turn off power at the circuit breaker and verify it’s off with a voltage tester before touching any wires.
Scenario 1: Replacing an Existing Fan
This is easier than a new install, as the wiring and ductwork are often in place.
- Power Off: Turn off the bathroom’s circuit breaker and verify with a voltage tester.
- Remove Old Fan: Pull down the grille, unplug the motor, and disconnect the house wiring from the fan’s junction box.
- Remove Old Housing: Unscrew the old fan housing from the ceiling joists. You may need attic access for this.
- Prepare for New Fan: Check if the new fan fits the existing hole. Enlarge the hole or add wood blocking if needed.
- Mount New Housing: Secure the new fan housing to the ceiling joists with the provided brackets and screws.
- Connect Ductwork: Attach the fan’s duct connector to the existing ductwork using HVAC foil tape for an airtight seal.
- Make Electrical Connections: Feed the cable into the new fan’s junction box and secure it. Follow the wiring steps in the section below.
- Test and Finish: Install the motor and grille, restore power, and test the fan.
Scenario 2: Installing a Brand New Fan
This is a more involved project requiring new wiring, ducting, and cutting.
- Choose a Location: Find a spot for the fan between joists, ideally between the shower and toilet, with a clear path for ductwork.
- Cut the Ceiling Hole: Mark the fan’s location and trace its outline. Use a drywall saw or jigsaw to cut the hole.
- Mount the Fan Housing: From the attic (if accessible), position the housing between joists and screw it in place. Without attic access, you’ll need to add supports from below.
- Run New Electrical Cable: Run a new cable from a power source (like a nearby junction box or the main panel) to the fan’s location. Use fish tape to pull the cable through walls and ceilings.
- Install the Exterior Vent: Install a roof or sidewall vent cap. Cut the appropriate hole, secure the cap, and seal it with roofing cement or silicone to make it weatherproof.
- Connect Ductwork: Connect the fan to the exterior vent with insulated ductwork, keeping the run as short and straight as possible. Seal all connections with foil tape.
- How to Install a Bathroom Vent Fan: This Old House provides a great visual guide for the installation process.
Safe Bathroom Exhaust Fan Wiring Connections
This is the core of the project. Double-check all connections for safety.
- Power is Off: Confirm the circuit breaker is off.
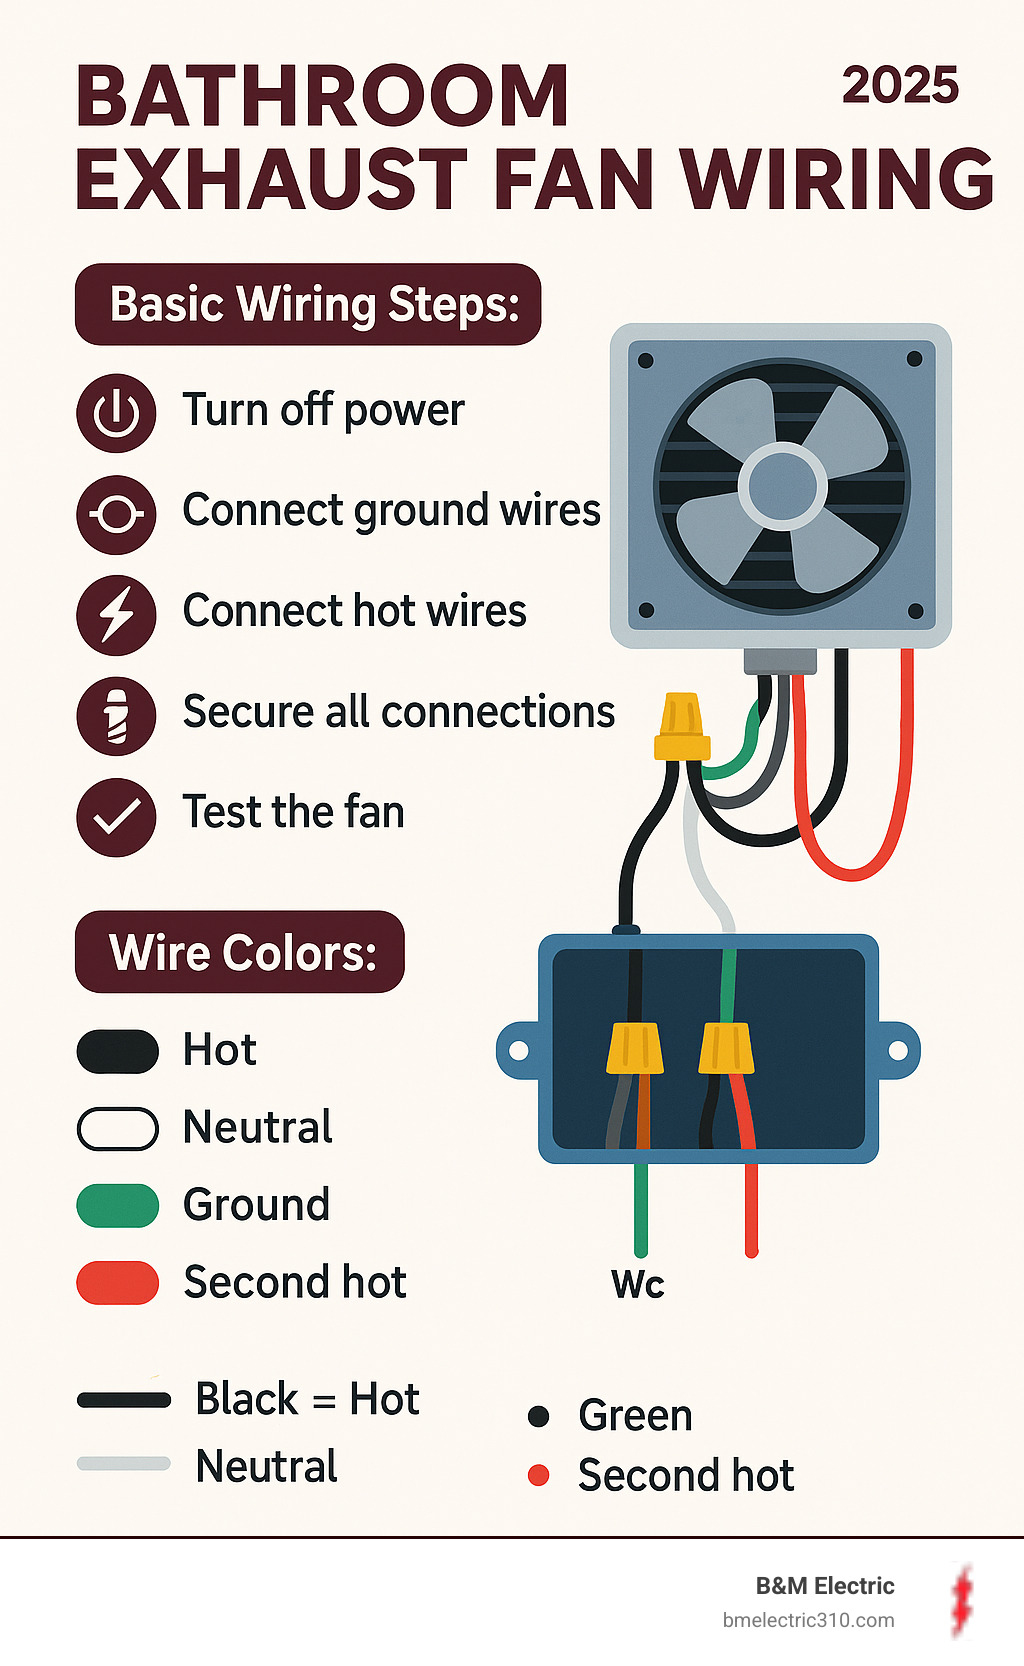
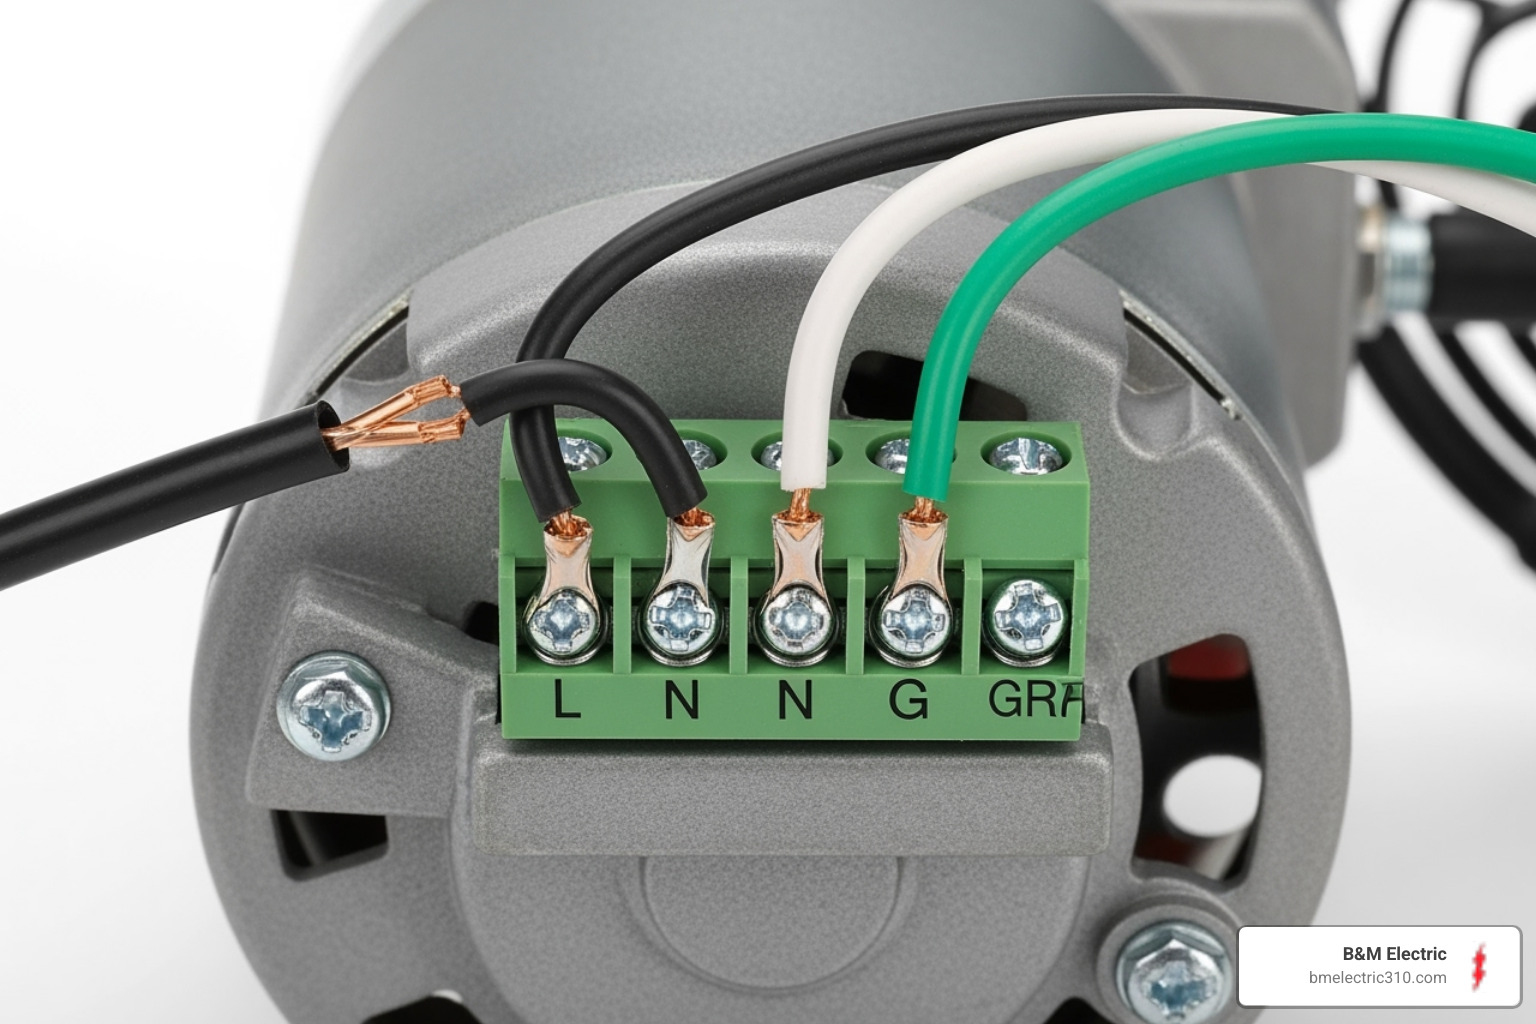
- Identify Wires: House wires are typically Black (hot), White (neutral), and Green/Bare (ground). A Red wire is a second hot for separate features.
- Connect Ground Wires: Connect the green/bare ground wire from the house to the fan’s ground wire or screw. This is a critical safety step.
- Connect Neutral Wires: Connect the white neutral wire from the house to the fan’s white wire(s).
- Connect Hot Wires:
- Fan Only: Connect the house’s black wire to the fan’s black wire.
- Fan/Light Combo (Single Switch): Connect the house’s black wire to both the fan’s black wire and the light’s hot wire (often blue or black). How To Wire a Bathroom Fan and Light On One Switch (8-Step Guide)
- Fan/Light Combo (Separate Switches): This requires 3-wire cable (black, red, white). Connect the black wire to the fan and the red wire to the light. How to Wire Bath Fan & Light on Separate Switches (14 Steps)
- Secure Connections: Use wire nuts to join the wires. Tug gently on each connection to ensure it’s secure.
- Finish Up: Tuck wires into the junction box, replace the cover, and test the fan.
For more wiring diagrams, see these Wiring Diagrams for Bathroom Exhaust Fans.
Common Mistakes and When to Call a Professional
Being aware of common pitfalls can save you headaches and potential hazards.
Common Mistakes to Avoid:
- Improper Venting: Never vent into an attic or wall cavity. Always vent to the outdoors to prevent mold and wood rot.
- Incorrect Fan Size: An undersized fan won’t effectively remove moisture. Always calculate the correct CFM for your space.
- Loose Connections: Poorly secured wires are a fire hazard. Ensure all wire nut connections are tight.
- Not Sealing the Vent: Gaps around the exterior vent can let in water and pests. Seal it thoroughly with silicone or roofing cement.
- Forgetting GFCI Protection: Bathroom circuits require Ground Fault Circuit Interrupter (GFCI) protection for safety.
- Poor Ductwork: Sagging or sharply bent ducts restrict airflow. Use insulated ductwork and keep runs short and straight.
For more on home electrical safety, read our guide on Information on electrical repairs for a safe home.
Troubleshooting Common Bathroom Exhaust Fan Wiring Issues
- Fan won’t turn on: Check the breaker, the wall switch, and all wiring connections. Ensure the motor is plugged in.
- Noisy operation: Look for loose mounting screws, a worn-out motor, or kinked/undersized ductwork.
- Poor suction: The fan may be too small (low CFM), the duct run may be too long or blocked, or the exterior vent cap could be clogged.
- Breaker tripping: This could signal a circuit overload (too much power draw) or a short circuit from a loose or damaged wire. Ensure your electrical box isn’t overfilled. How to count conductors.
When to Call a Licensed Electrician
Some tasks are best left to professionals for safety and code compliance.
Call an electrician if you encounter:
- Old Wiring: Homes with knob-and-tube, aluminum, or old ungrounded wiring require an expert.
- No Existing Power Source: Running a new circuit from the electrical panel is a job for a professional.
- Complex Wiring: Setups with multiple switches, timers, or heaters can be intricate. An electrician will ensure it’s done right.
- You’re Uncomfortable with Electrical Work: If you’re not 100% confident, it’s always safer to call a pro.
- Code Compliance Concerns: An electrician ensures your installation meets all local building and electrical codes.
At B&M Electric, we have 50 years of local expertise in Torrance, CA, and the South Bay. Our residential services handle everything from complex new installations to safe replacements. Our residential electrician services
Frequently Asked Questions about Bathroom Fan Wiring
Here are answers to some common questions about bathroom exhaust fan wiring.
How do I wire a fan if my house has a red wire but the new fan doesn’t?
A red wire is typically a second hot wire for a separate feature like a light. If your new fan is a single-function unit, you don’t need the red wire. Simply cap it off with a wire nut to insulate it and tuck it safely into the junction box. I’m installing a bathroom fan. My home wires have red, black, and ground wires. The fan however, has two, two black, and
Can I wire a bathroom fan and light to the same switch?
Yes. To have a fan and light turn on together, connect the black (hot) wire from the switch to both the fan’s hot wire and the light’s hot wire. All white (neutral) wires connect together, and all ground wires connect together. This is a common and convenient setup. How To Wire a Bathroom Fan and Light On One Switch (8-Step Guide)
What size (CFM) fan do I need for my bathroom?
Sizing your fan correctly is crucial for proper ventilation. The general rule is to provide 1 CFM per square foot of floor space for bathrooms up to 100 sq ft. For larger bathrooms, you should also add CFM for each fixture (e.g., 50 CFM for a shower, 50 CFM for a toilet). Always choose a fan that meets or exceeds your calculated CFM requirement.
Conclusion: A Safer, Fresher Bathroom Awaits
A properly wired bathroom exhaust fan is a vital component of your home’s health. It prevents moisture damage, improves air quality, and keeps your bathroom comfortable. We hope this guide has demystified bathroom exhaust fan wiring and empowered you to tackle your project with confidence. Safety always comes first.
For complex installations, old wiring, or simply for the peace of mind that comes with professional expertise, don’t hesitate to reach out. Our team at B&M Electric is here to ensure your project is done right. For any concerns with your home’s wiring in the Torrance area, trust our experts. Contact us for your home remodel electrical installation needs.


